
Overview
After building the original hardening layer for my personal WordPress site, I expanded the plugin into something more useful than a collection of security controls. The next step was visibility: knowing when important files changed, seeing which suspicious requests still reached WordPress, and managing those signals from inside the admin dashboard.
This project documents that evolution of the Severino Labs Security Layer. The plugin now combines file integrity monitoring, security event logging, admin-facing status dashboards, passkey readiness safeguards, and a Git-based development workflow into one reviewable codebase. Instead of relying on scattered snippets or manual server edits, I wanted a security layer I could understand, test, maintain, and explain.
Why I Expanded the Security Layer
The first version of the security layer was mostly about reducing exposure. It blocked unnecessary WordPress entry points, removed common enumeration paths, sent browser security headers, and supported the custom passkey-first login experience. That was useful, but it still left an important gap: it did not give me much visibility into what was happening after the controls were in place.
Hardening and monitoring solve different problems. Hardening reduces what is exposed. Monitoring helps confirm whether files changed, whether blocked paths are still being probed, and whether the security layer is actually doing useful work in the live environment.
That is why I expanded the plugin beyond prevention-focused controls. I wanted the WordPress side of the stack to answer practical questions directly from the admin dashboard: Has anything changed on disk? When was the last integrity check? Are XML-RPC or enumeration attempts still reaching the application? Which requests are being handled by the plugin instead of being stopped at Cloudflare?

This turned the project from a simple hardening plugin into a small application-layer security monitoring system. The goal was not to replace Cloudflare, backups, malware scanning, or host-level controls. The goal was to add local visibility and integrity checks to the custom security layer I was already maintaining.
Plugin Architecture
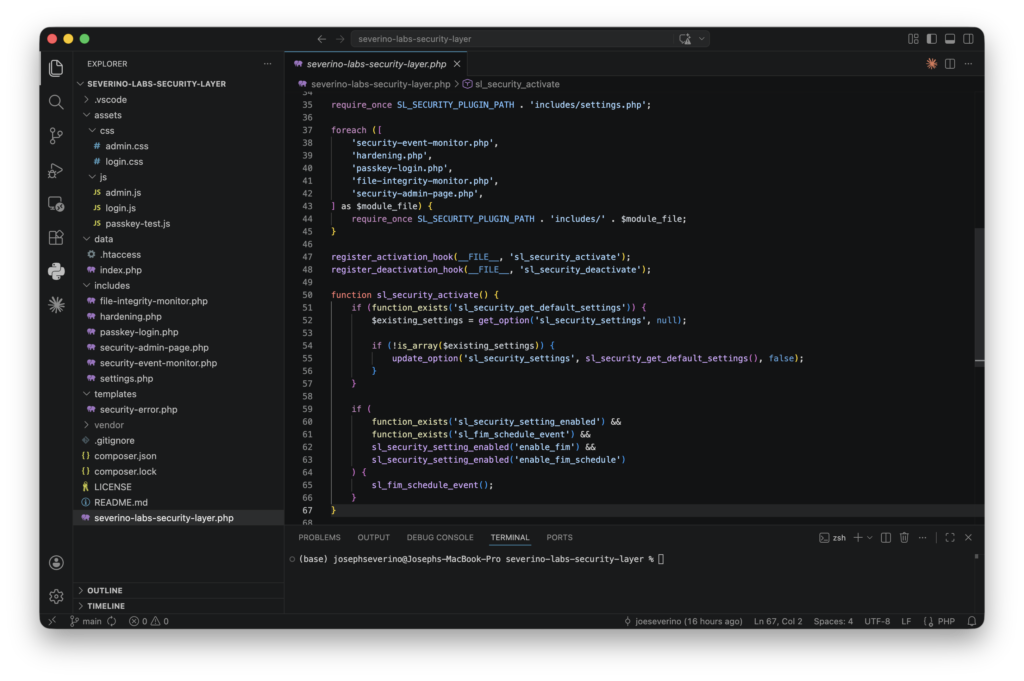
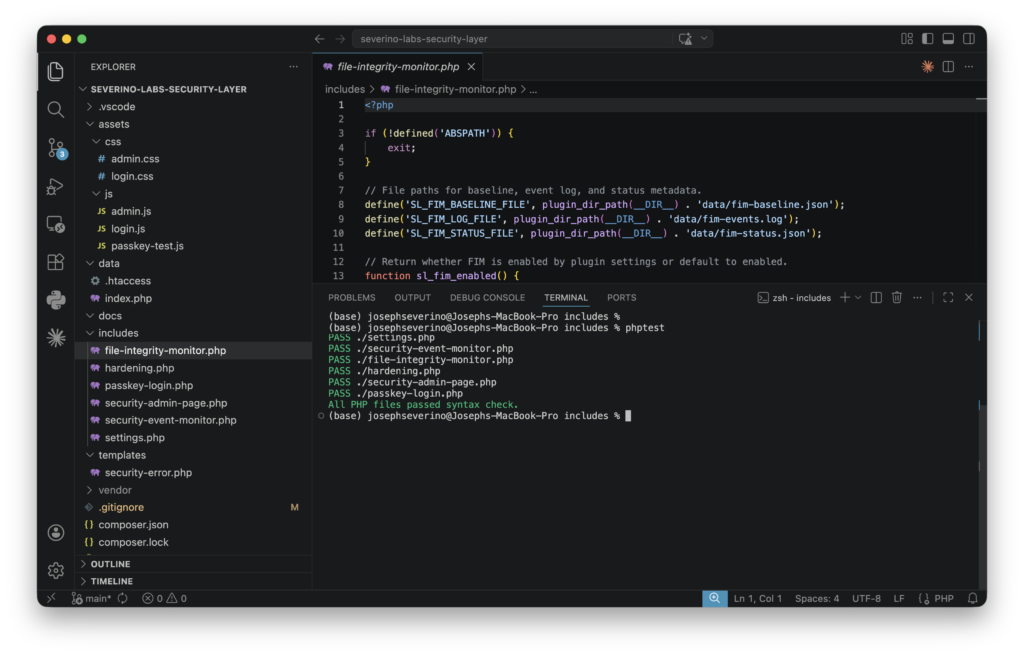
The plugin is organized as a small set of focused modules instead of one large file. The main plugin file defines the plugin metadata, constants, activation behavior, and module loading. Each major responsibility then lives in its own include file: settings, hardening, file integrity monitoring, security event monitoring, passkey login, and the admin interface.
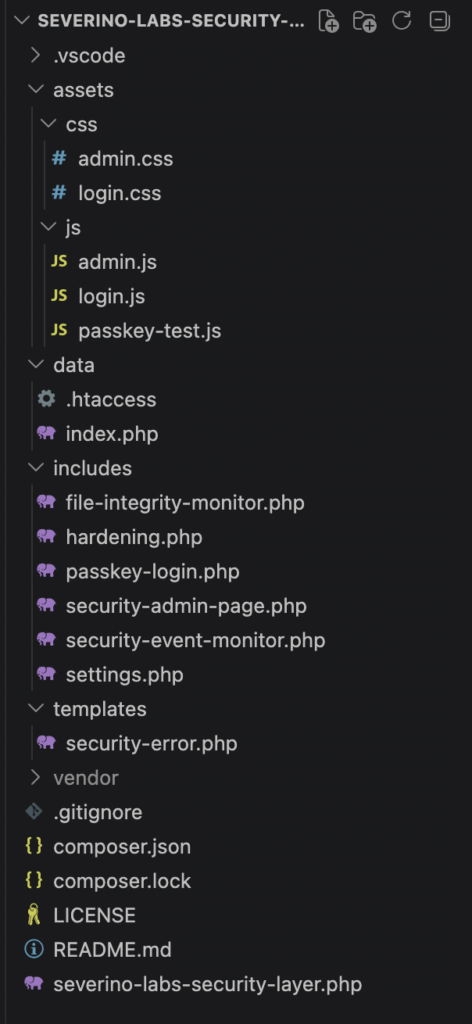
That separation made the plugin easier to reason about as it grew. The hardening logic can be reviewed separately from the file integrity monitor, the event logger can be reviewed separately from the admin UI, and the passkey login code stays isolated from the monitoring features.
I also separated static assets and runtime data. CSS and JavaScript live under the assets directory, the custom security error page lives under templates, and runtime artifacts such as logs and FIM baselines live under data. The data directory is intentionally excluded from Git so local security logs and file hashes are not published with the codebase.
File Integrity Monitoring
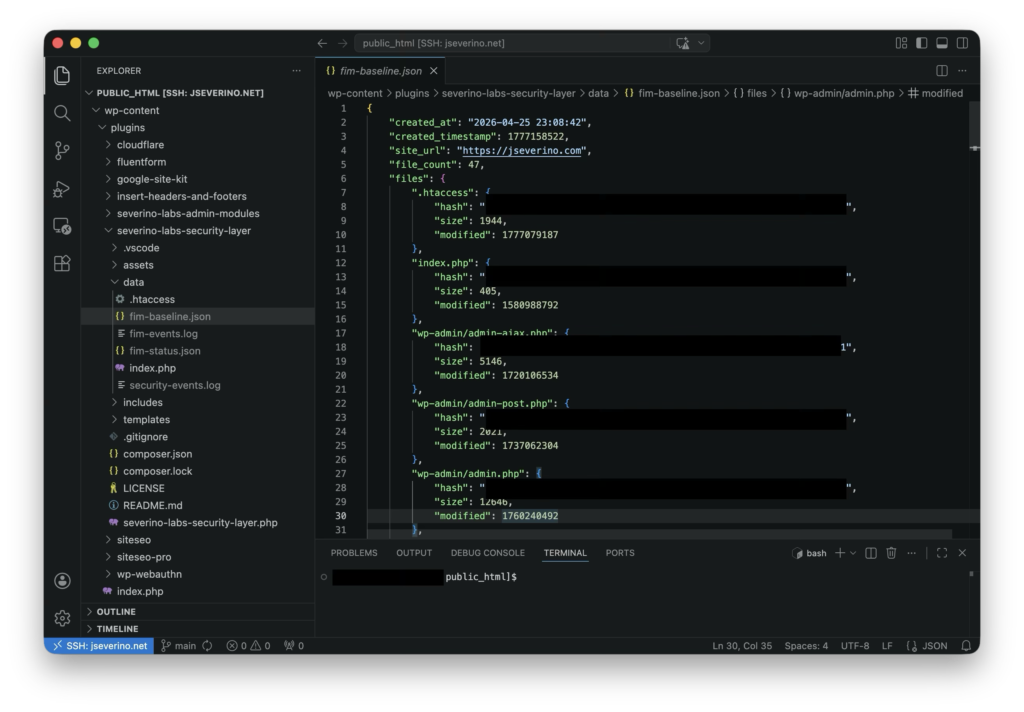
File Integrity Monitoring was the first major detection feature I added to the plugin. The idea is straightforward: define which files and directories matter, create a trusted SHA-256 baseline of those files, and compare future checks against that known-good state.

The baseline is what makes the monitor useful. It only has value if it represents a file state I actually trust, so I create or refresh it after confirming the current WordPress, plugin, and theme files are expected. Once that baseline exists, the plugin can report whether important files were added, removed, or modified.
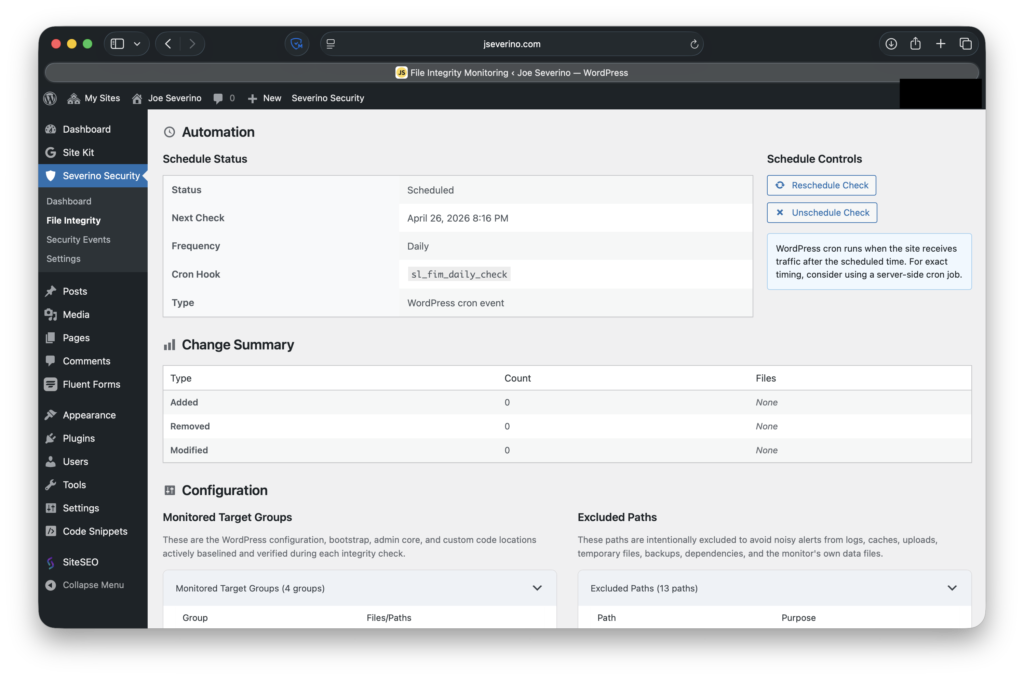
I also added scheduled checks through WordPress cron so integrity monitoring does not depend only on manual review. The schedule gives the plugin a recurring way to check the current file state and preserve recent activity in the local FIM log.
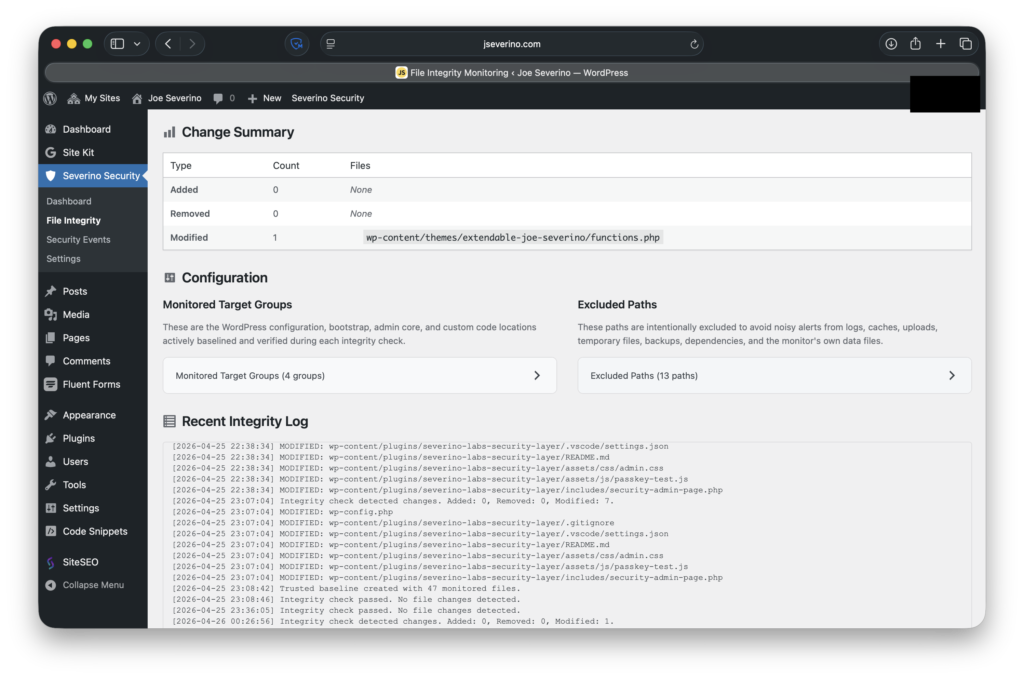
After intentionally modifying the child theme’s functions.php file, the integrity check flagged it as a modified file instead of treating all filesystem changes as generic alerts.
Not every file belongs in an integrity check. Core entry files, WordPress configuration files, the security plugin, and the child theme are useful targets. Logs, caches, uploads, backups, temporary files, Composer dependencies, and Git metadata are intentionally excluded so the monitor does not create noise from files that are expected to change.
This does not make the plugin a malware scanner. It does not decide whether a change is malicious by itself. Its job is narrower and more reliable: tell me when an important file no longer matches the trusted baseline.
Security Event Monitoring
Security Event Monitoring was the second half of the detection layer. File integrity monitoring answers whether important files changed. Event monitoring answers what suspicious requests are still reaching the WordPress application.
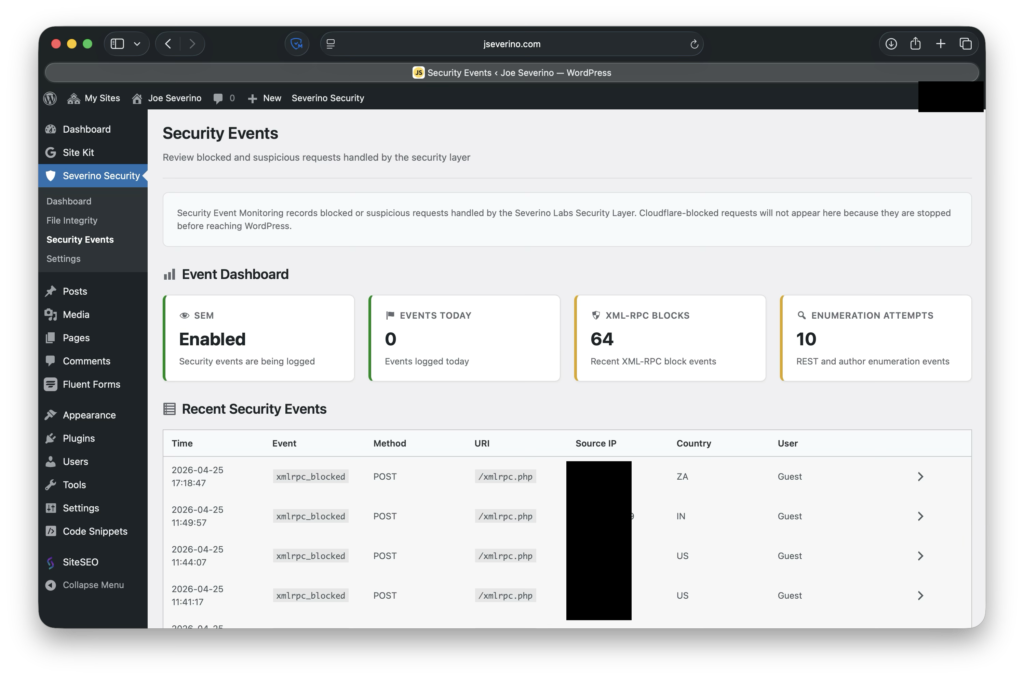
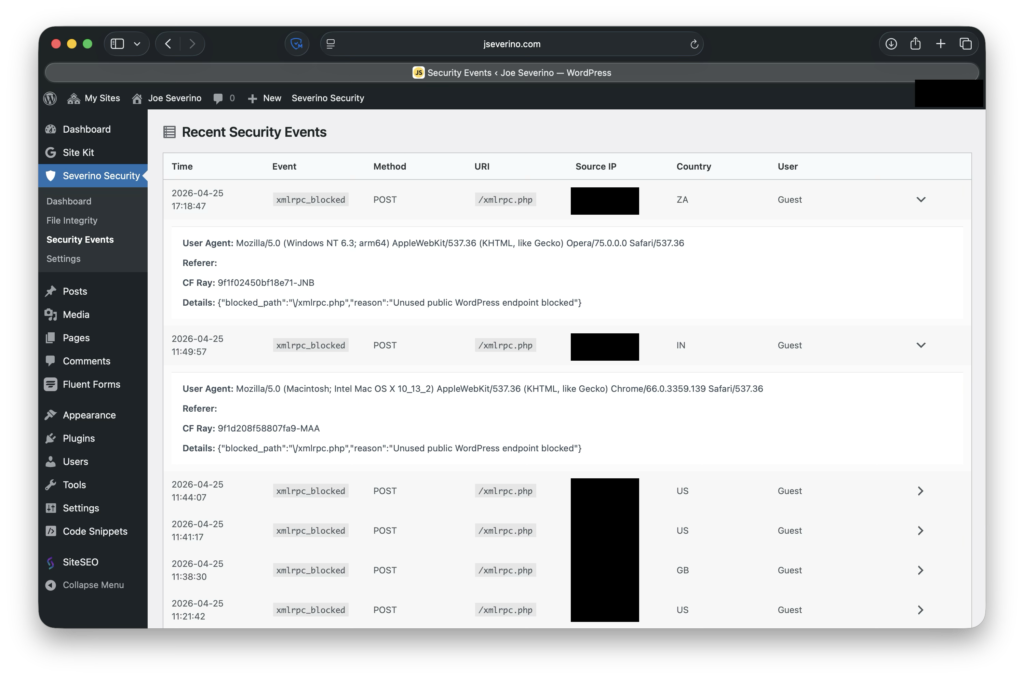
The event logger records requests handled by the security layer, including XML-RPC probes, REST API user enumeration attempts, author enumeration attempts, and requests that reach the custom security error page. Each event includes the request URI, HTTP method, source IP, user agent, referer, user context, and Cloudflare metadata when those headers are present.
This distinction matters because Cloudflare and WordPress see different parts of the request path. If Cloudflare blocks a request at the edge, WordPress never sees it and the plugin cannot log it. If the request reaches WordPress, the plugin can classify it, block it, and preserve local context for review.
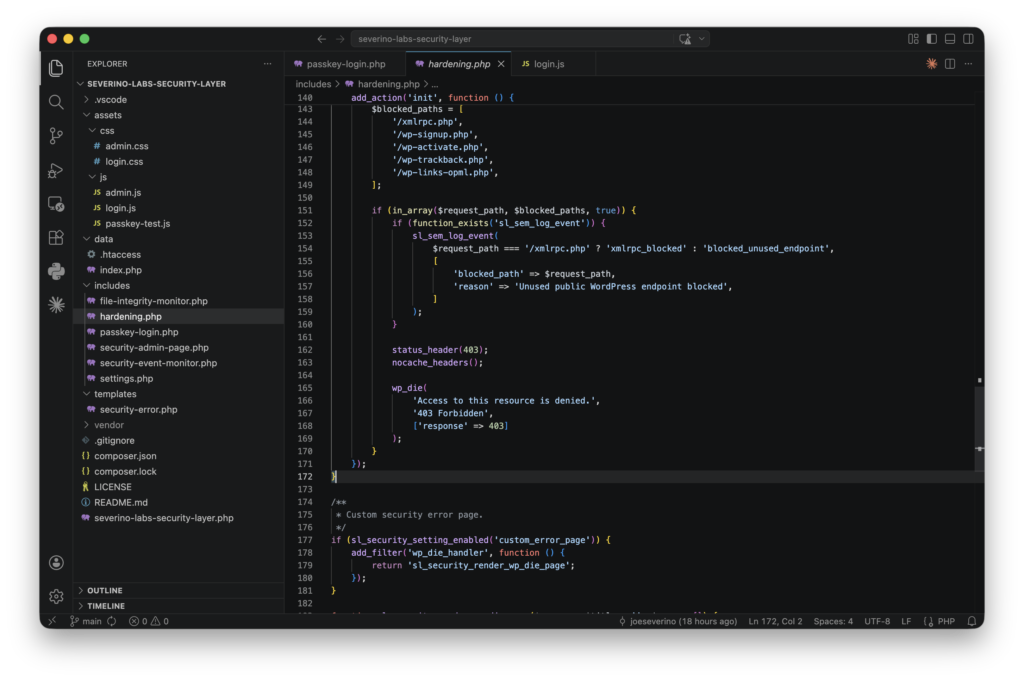
/xmlrpc.php separately from other blocked endpoints and preserving the reason before returning a 403 response.That gave me two layers of visibility: Cloudflare for edge enforcement, and the plugin for application-layer events that actually touched the WordPress environment.
Admin Dashboard and Visibility
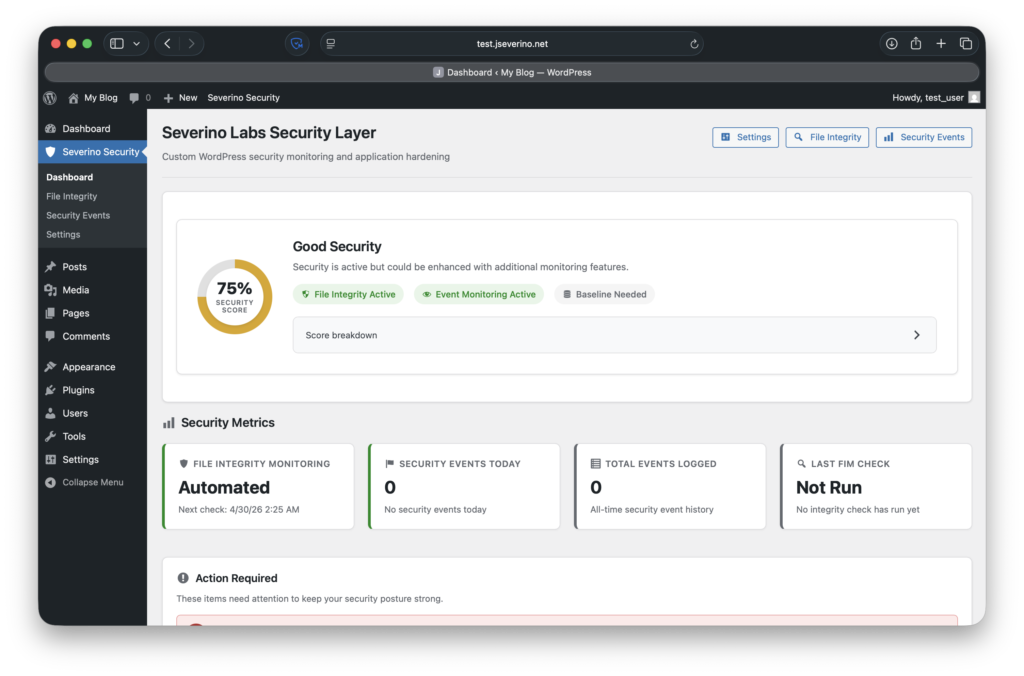
After adding file integrity monitoring and security event logging, I built the admin dashboard around visibility instead of configuration alone. The goal was to make the plugin answer the obvious questions quickly: is monitoring enabled, does a trusted baseline exist, did the last integrity check pass, are security events being logged, and is anything worth reviewing?
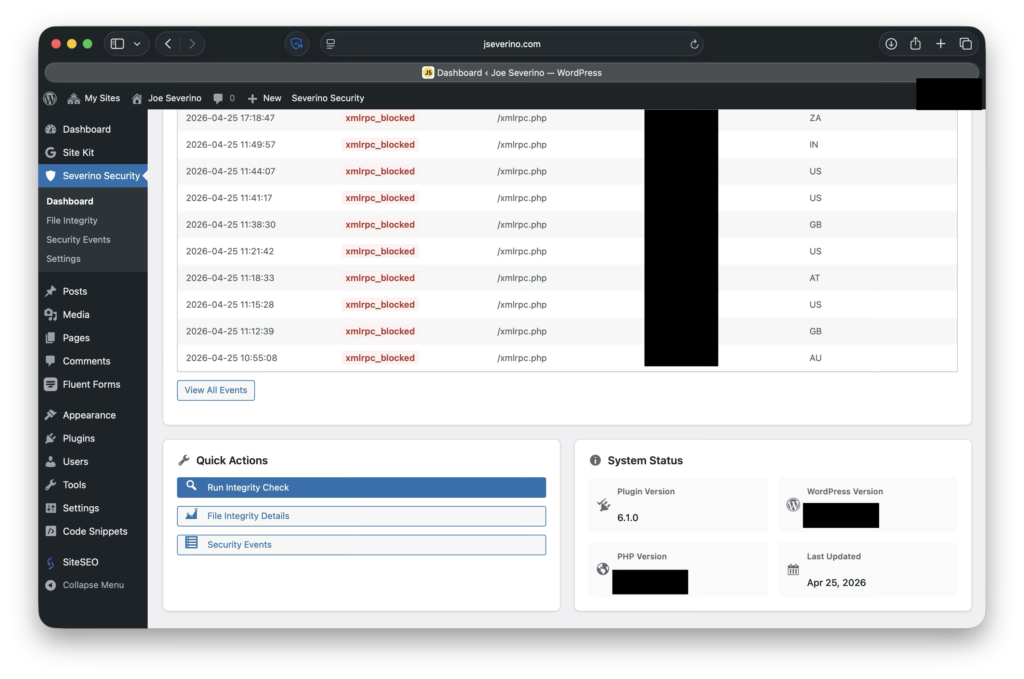
The dashboard pulls those signals into one place. It shows the current plugin health, recent security activity, quick actions, system information, and links into the deeper File Integrity and Security Events pages.
The security score is not meant to be a universal rating of the entire WordPress environment. It is a local health indicator for this plugin’s own coverage. It reflects whether the plugin is active, whether FIM and SEM are enabled, whether a trusted baseline exists, whether the latest integrity check passed, and whether the recent event history is clean.
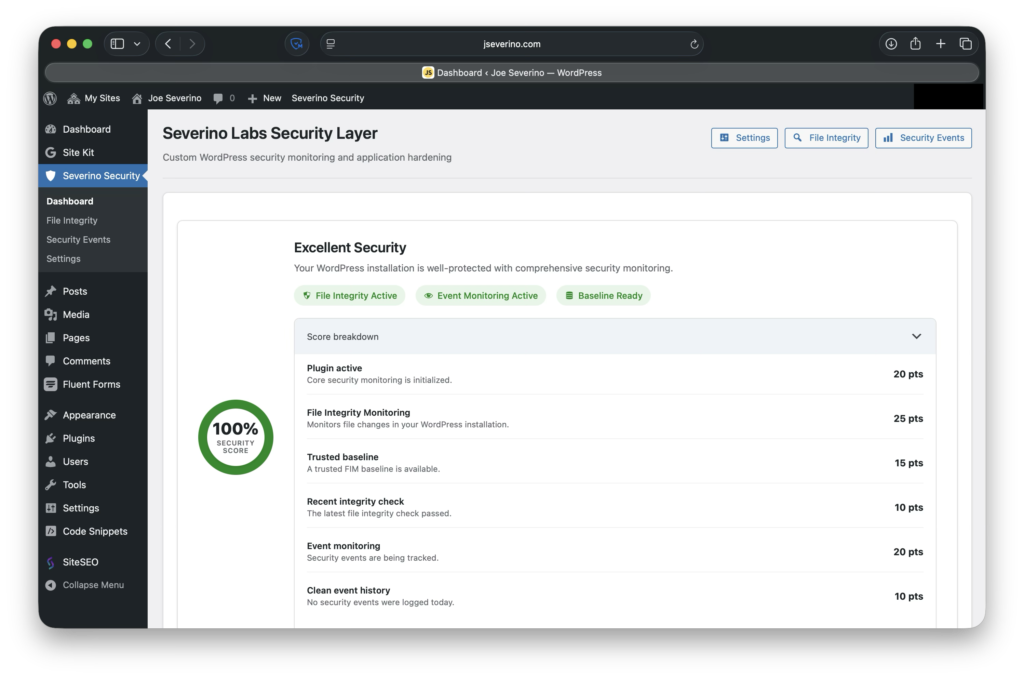
That visibility made the plugin feel less like a set of hidden hooks and more like a security layer I could operate day to day.
Daily Security Report with SMTP Delivery
After building the admin dashboard, I added a scheduled daily security report so the plugin could summarize its current state without requiring me to manually log into WordPress every day. The report is delivered as a branded “Daily Security Dashboard” email and includes the plugin health score, file integrity status, security event totals, recent activity, top event types, and the next scheduled FIM check.
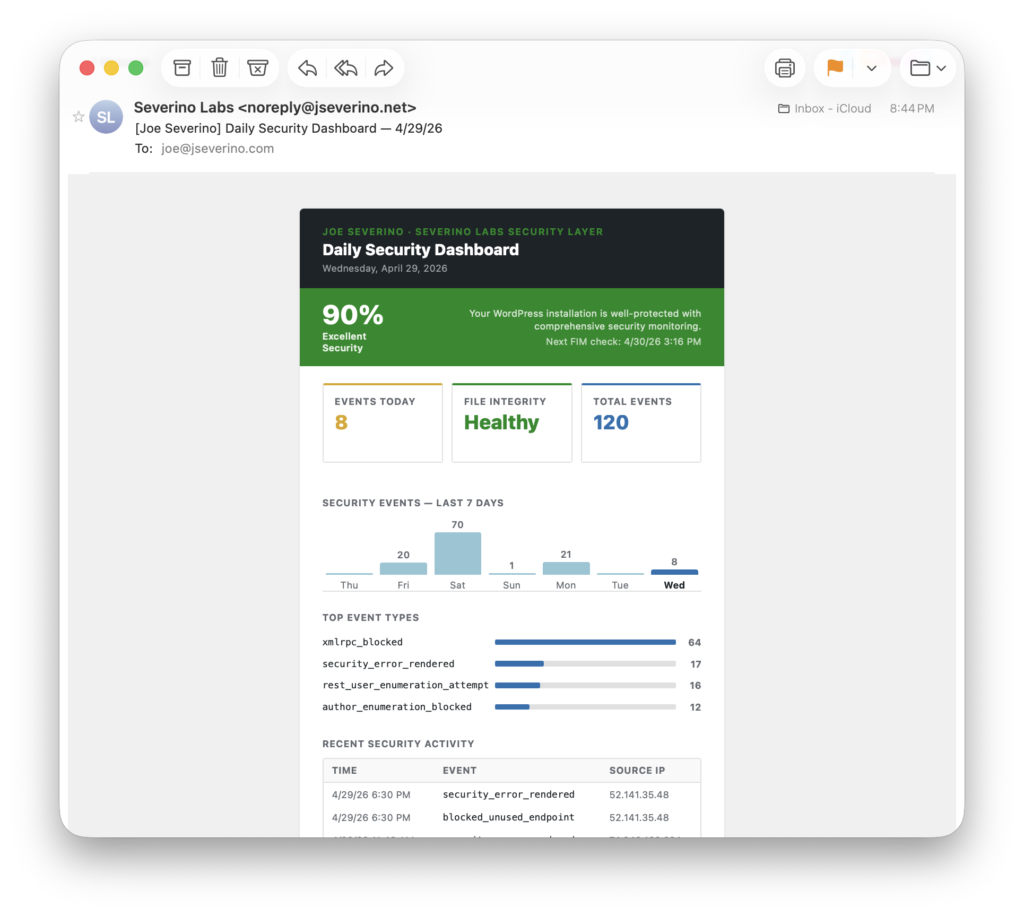
The report is delivered through configurable SMTP settings instead of relying only on default WordPress mail behavior. This lets the plugin send authenticated email through a defined mail provider and makes the notification workflow more reliable and production-like. The SMTP password is handled defensively in the settings UI: once saved, it is never rendered back into the form, and the field can be left blank to preserve the existing credential.
This completed the monitoring loop I wanted for the project: the plugin hardens WordPress, records application-layer security events, checks important files against a trusted baseline, summarizes the current state in the dashboard, and sends a daily status report through authenticated SMTP delivery.
Protecting Runtime Security Data
Because the plugin creates local security data, I separated runtime artifacts from the public codebase. File integrity baselines, FIM logs, SEM logs, and status files are useful on the live site, but they do not belong in GitHub.
Those files can reveal details about the live environment, including monitored paths, timestamps, request patterns, source IPs, user agents, and Cloudflare metadata. The public repository should explain how the system works without exposing the site’s operational data.
I protected that runtime data in multiple places. Git ignore rules exclude logs, JSON state files, local archives, Composer dependencies, temporary files, environment files, and key material patterns from the repository. Inside the plugin’s data directory, .htaccess and index.php provide an additional guard against direct browsing. At the edge, Cloudflare also blocks sensitive file types and paths before they should ever reach WordPress.

This is not about treating the FIM baseline or event log as secret application credentials. It is about keeping operational security data out of a public repository and reducing unnecessary exposure of files that only the plugin should need.
Git-Based Development, Deployment, and Reusable Tooling
As the plugin grew, I moved from browser-based editing to a real development and deployment workflow. I started with WordPress and cPanel edits, then moved to SSH, and eventually made my local Git repository the source of truth.
Now changes start locally in VS Code. I review the files, run basic checks, commit the update, push it to GitHub, and deploy from there. The live server is no longer where development happens. It only pulls approved code from the repository.
The main shortcut is slpush “message” , which turns the release path and live deployment into one repeatable command:
- Confirms I am on main
- Stages the current changes
- Stops cleanly if there is nothing to commit
- Shows the pending Git status
- Creates the commit with my message
- Pushes the commit to GitHub
- Sends an SSH command to the server
- Runs git pull –ff-only inside the live plugin directory
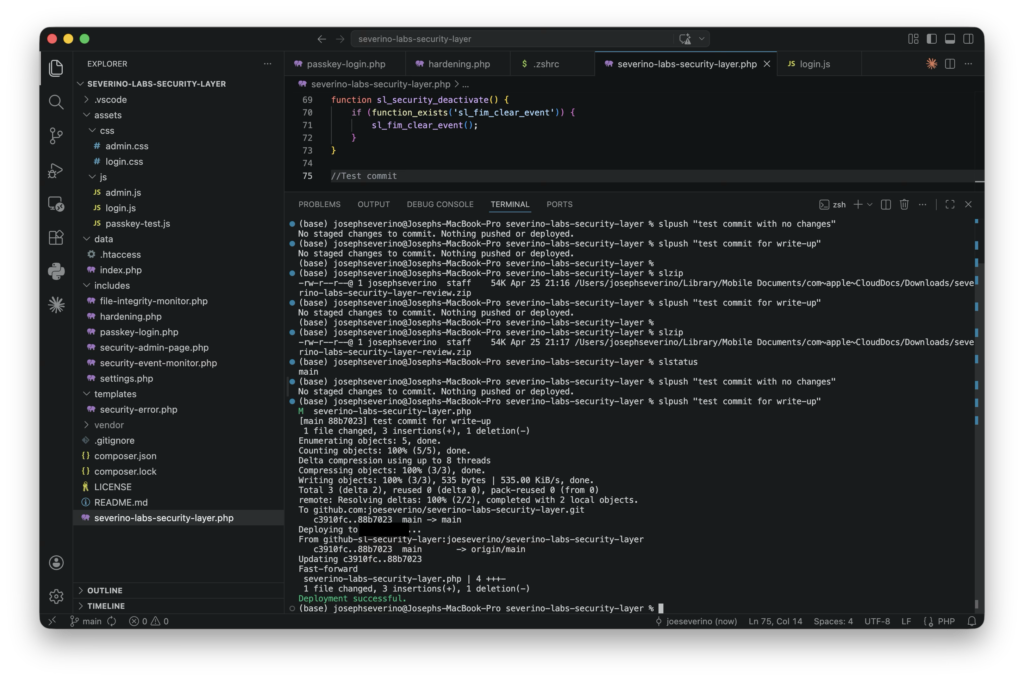
slpush shortcut validates the local state, commits and pushes approved changes, then sends a non-interactive SSH command to the server so the live plugin directory can run a fast-forward-only pull, and replies with confirmation.The slpush shortcut validates the local state, commits and pushes approved changes, then sends a non-interactive SSH command to the server so the live plugin directory can run a fast-forward-only pull, then returns the result in my local terminal.
The SSH part is important. The command does not open an interactive server session that I then work inside manually. It sends one remote command to the server, performs the deployment pull, and exits.
Authentication is also separated. My local machine and the web server use different SSH keys with different roles. The server uses a read-only deploy key, so it can pull the repository but cannot push changes back. Passphrases stay on my local machine through the SSH agent/keychain, so the production server does not need my personal GitHub key or signing key.
As the workflow matured, I realized the deployment process itself had become part of the project. It was no longer just a shortcut for one plugin. It was a repeatable pattern for building, versioning, packaging, and deploying small projects without editing live production files.
That led me to separate the workflow into its own reusable project: zsh-git-deploy-workflow. Instead of leaving it as a private .zshrc snippet, I generalized it into a small Bash + Zsh tool that can bootstrap project-specific shortcuts, SSH host aliases, key separation, clean ZIP creation, fast-forward-only server pulls, and uninstallable marker blocks for ~/.zshrc and ~/.ssh/config.
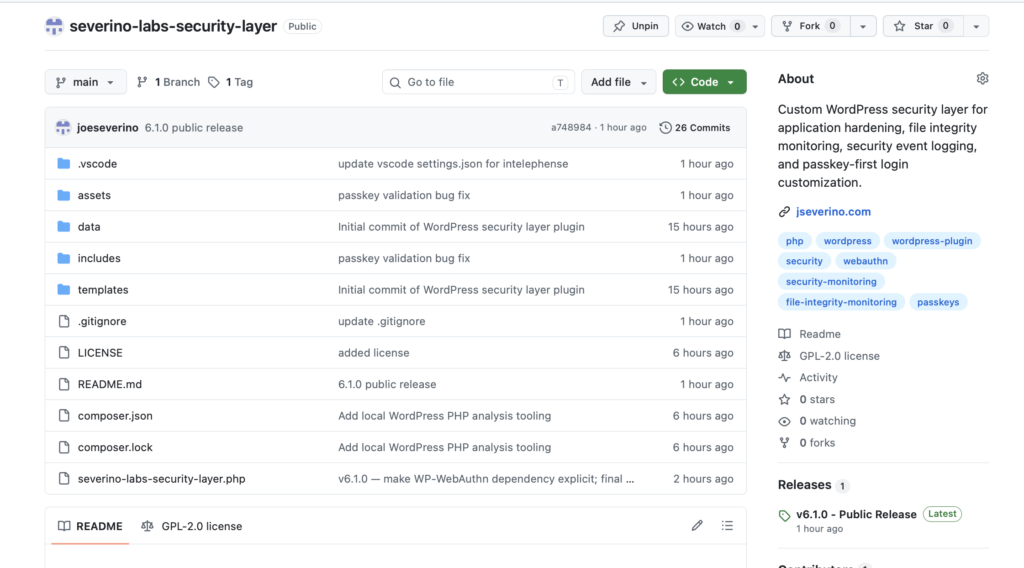
That separate repository became part of the larger story: the plugin improved my WordPress security layer, and the deployment workflow improved how I safely maintain that layer.
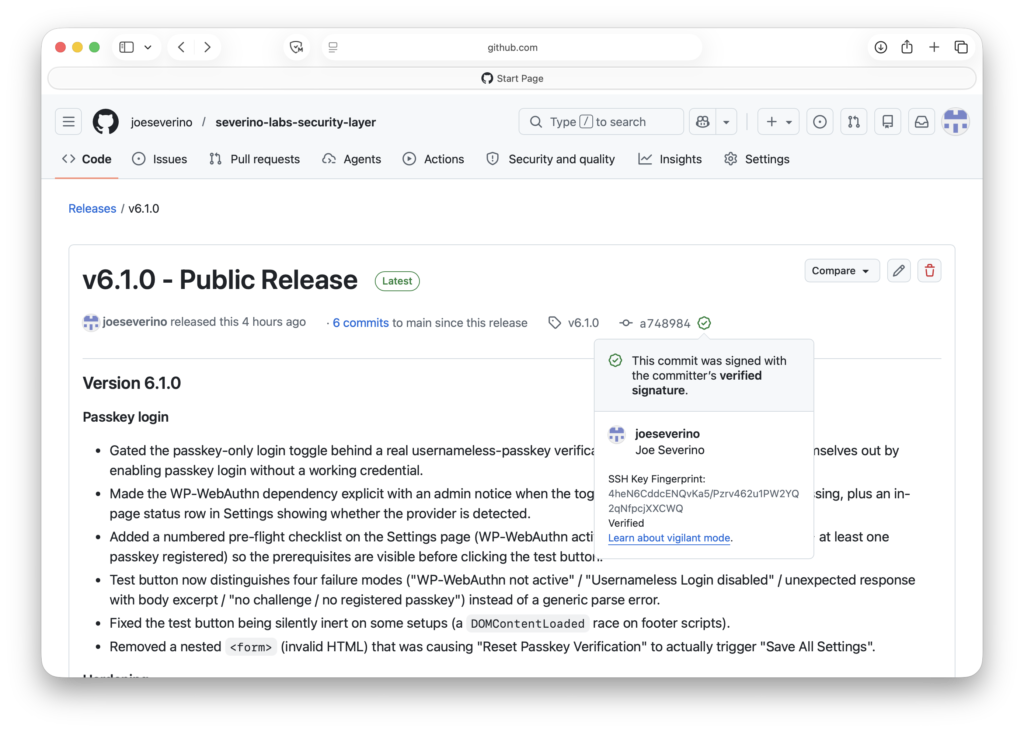
For repository integrity, I use GitHub vigilant mode and signed commits. That gives the public release history a strong audit trail while keeping signing keys local instead of placing them on the production server.
This workflow made the project easier to review, deploy, and recover from. Instead of one-off edits inside a live WordPress environment, changes now move through a repeatable path: local development, Git review, GitHub push, server pull, and live validation.
Validation and Real-World Events
Before treating the plugin as ready, I validated it from a few different angles: code checks, repository hygiene, install testing, staged WordPress testing, and live security events.
First, I tested the code itself. I added a small phptest shell helper to run PHP syntax checks across the plugin files, then reviewed the repository for sensitive local artifacts before making it public. That included checking for private keys, environment files, local runtime logs, JSON state files, archive exports, and other files that should not be committed.
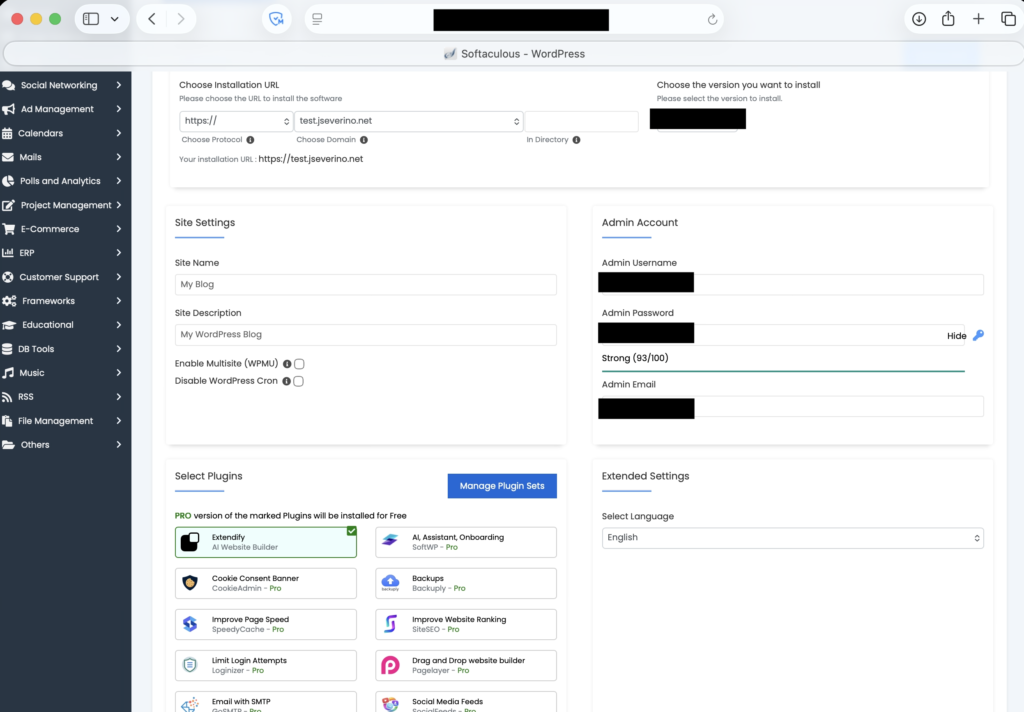
I also tested the plugin like a normal WordPress plugin instead of only relying on the production copy. I created a separate WordPress test site, packaged the plugin as a clean ZIP using slzip, uploaded it through the standard plugin installer, activated it, and confirmed the admin pages loaded correctly.
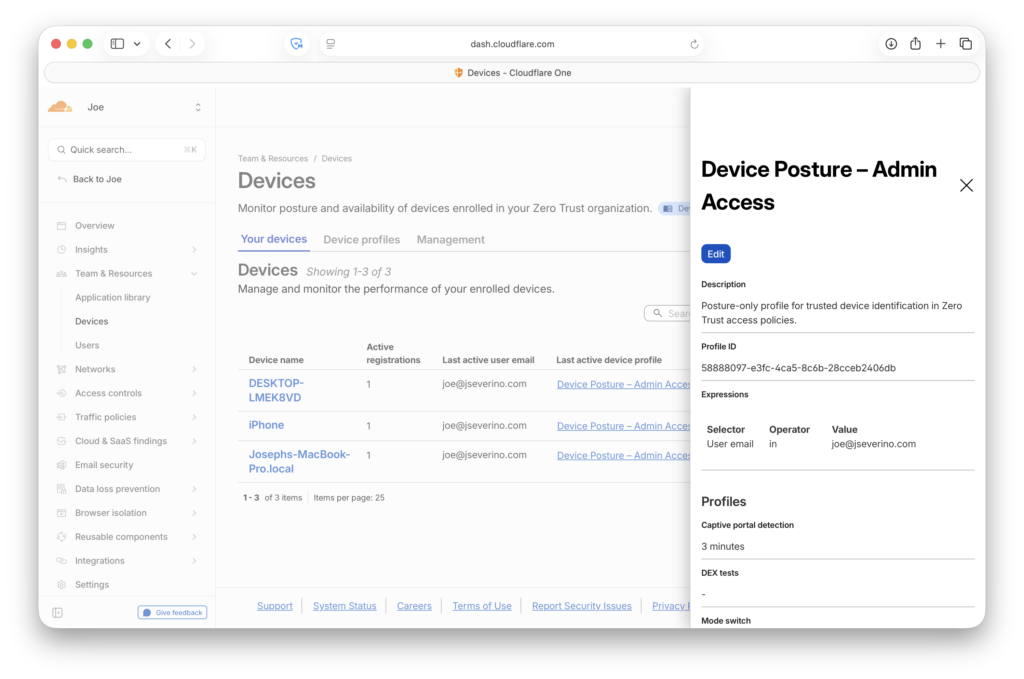
The TST environment is isolated behind Cloudflare Zero Trust Access. The subdomain, test.jseverino.net, is not publicly reachable. Access requires my admin email allowlist and the same WARP device posture model used for administrative access. That let me validate the plugin in a real WordPress install while keeping the staging environment blocked at the edge.
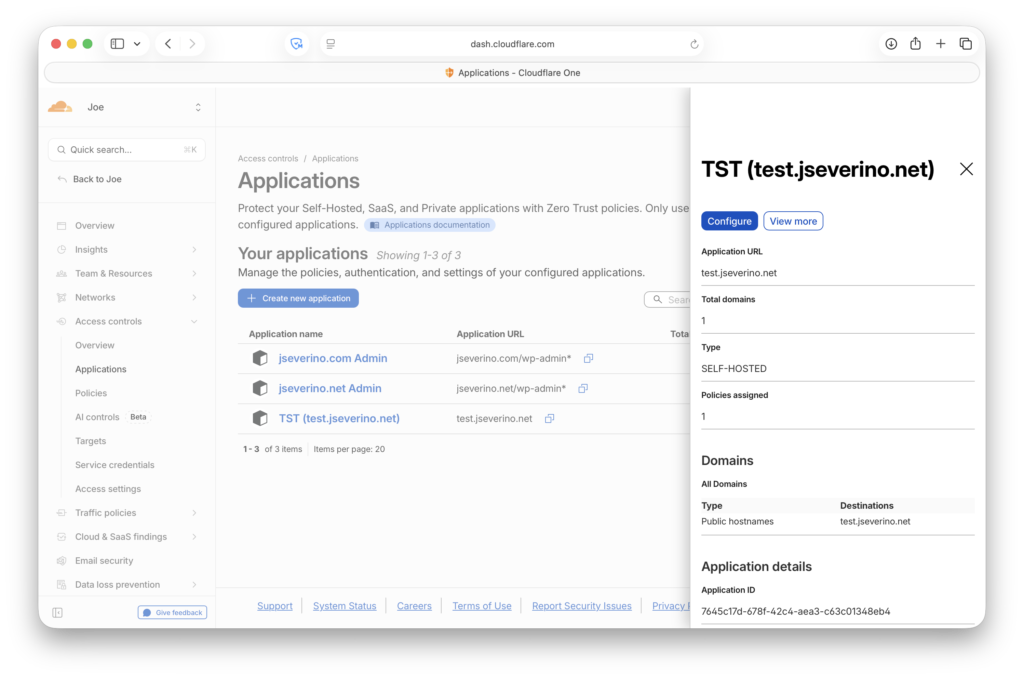
One useful validation point was that the test environment still showed zero WordPress-side security events after several days. Since the subdomain was protected by Cloudflare Zero Trust, that was the expected result: unauthorized requests should be stopped at the edge before WordPress or the plugin ever sees them. In this case, a quiet SEM log was a good sign because the test site was not meant to be publicly reachable.
Cloudflare shows what is blocked at the edge. The plugin shows what reaches WordPress and is handled at the application layer. Together, they gave me a better picture of where enforcement was happening and whether the custom security layer was doing useful work after release.
Conclusion
This project started as a fun way to harden my WordPress site, but it turned into a full application-layer security project. The final plugin now combines WordPress hardening, browser security controls, file integrity monitoring, security event logging, a passkey-first login option, runtime data protection, and a Git-based deployment workflow.
The biggest value was not any single feature. It was bringing the pieces together into something I could operate and making the most out of the tools at hand: Cloudflare handles edge protection, Zero Trust protects administrative and test access, the plugin records what reaches WordPress, FIM validates trusted files, and Git keeps the whole project versioned and repeatable.
This also gave me a better appreciation for the difference between adding security controls and engineering a security layer. The controls need to be visible, testable, documented, and safe to maintain over time. That became the real goal of the project, and it’s been great learning about what specific systems hardening tools are available. Clone this repository to your WordPress server and give it a try!
$ cd severino-labs-security-layer
$ ls
LICENSE README.md assets includes templates