Overview
I run a private cloud and homelab setup where no services are exposed to the public internet. The stack is a DigitalOcean VPS, a Windows homelab host running Hyper-V, and an Ubuntu Server VM that hosts all Docker services, all connected over a Tailscale WireGuard mesh. Remote users on the tailnet reach internal services over encrypted WireGuard tunnels, browser-trusted TLS terminates at Caddy on the VPS, and three independent enforcement layers sit between any attacker and an application. This writeup covers the full design: how the network is structured, why each security decision was made, and where the remaining risks sit.
The Network Foundation: Tailscale
Everything runs on a Tailscale tailnet: a WireGuard mesh connecting a cloud VPS, a Windows homelab host, an Ubuntu Server VM, and admin devices. Tailscale handles key distribution, NAT traversal, and access control. No node trusts another by default. ACLs define exactly which node can reach which port on which other node.
The VPS has a public IP, so tunnels to it are typically direct peer-to-peer. The homelab nodes sit behind residential NAT and use Tailscale’s DERP relay as a fallback when direct paths aren’t available, but traffic stays encrypted through WireGuard either way.
Tailnet Lock
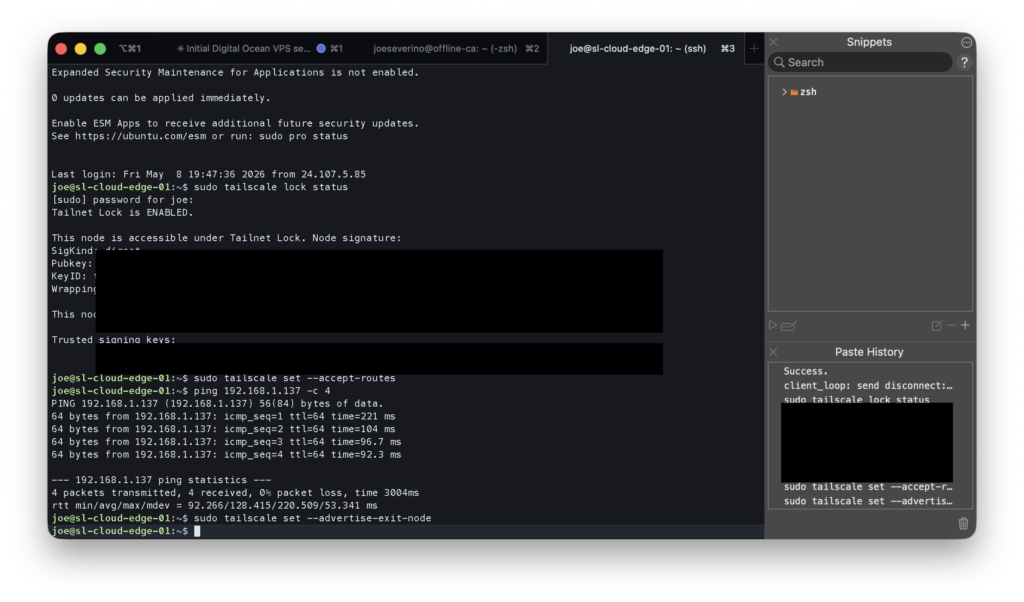
The most important Tailscale setting in this setup is tailnet lock. When it’s enabled, a new device cannot join the tailnet just because it was authorized in the admin console. Its WireGuard key must also be co-signed by one of two designated signing nodes. In my case that’s my MacBook Pro and iPhone. An attacker who compromised my Tailscale account credentials would still be unable to add a rogue node without physical access to one of those devices and the ability to bypass its authentication.
Both signing devices are enrolled in MDM and protected by iCloud Advanced Data Protection, which applies end-to-end encryption to iCloud data. Apple cannot access the contents, and neither can anyone who compromises an Apple account without the device PIN.
The VPS: Zero Public Attack Surface
The cloud VPS is the only node with a public IP, so its exposure matters most. The goal was simple: present no reachable services to the public internet.
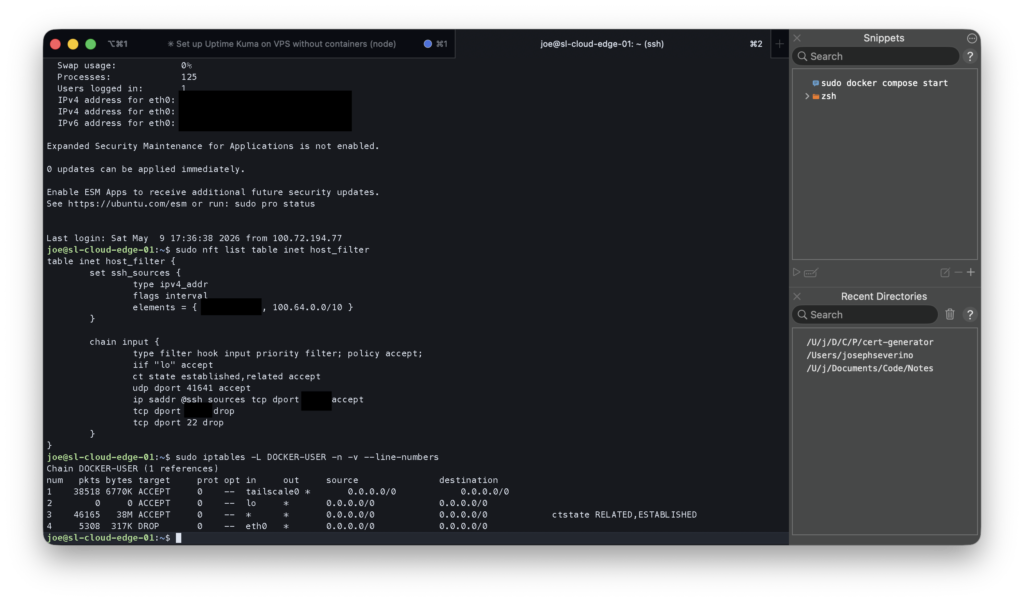
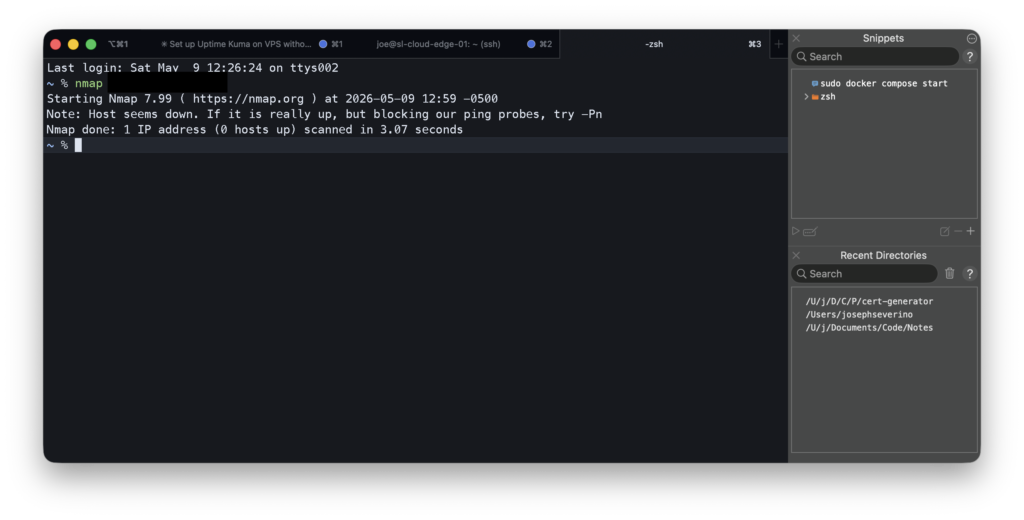
The host firewall is native nftables. I removed UFW entirely. The rules are explicit: port 22 is dropped completely, SSH runs on a non-standard port and is accepted from two sources: the Tailscale CGNAT range (100.64.0.0/10) for normal remote access, and my home LAN as a fallback in case Tailscale is unavailable. Everything else drops silently. When you scan the VPS from the public internet, every port shows filtered, not closed. The host doesn’t respond at all.
Docker complicates host firewalls because it manages its own iptables rules and can bypass UFW. The fix is the DOCKER-USER chain, which is evaluated before Docker’s own rules. I added a rule that drops all traffic arriving on the public Ethernet interface (eth0) before it reaches any container. After Tailscale decrypts the tunnel, private traffic appears on the Tailscale interface and is allowed by policy.
SSH is hardened further: key-only authentication, an explicit user allowlist, MaxAuthTries 3, and fail2ban with incremental bans. Three failed attempts in 10 minutes mean a one-hour ban, increasing up to a week for repeat offenders. Unattended upgrades handle OS security patches automatically.
The Homelab: Headless, Firewall-First
The homelab runs on a Windows OptiPlex that sits headless in a corner with no monitor or keyboard. All management happens over the network. A Hyper-V VM running Ubuntu Server handles all Docker services.
Windows Host
Windows Firewall scopes both SSH (port 22) and RDP (port 3389) exclusively to the Tailscale CGNAT range. LAN-originated management connections are dropped. There’s no path into the management plane from the local network. Tailscale is required.
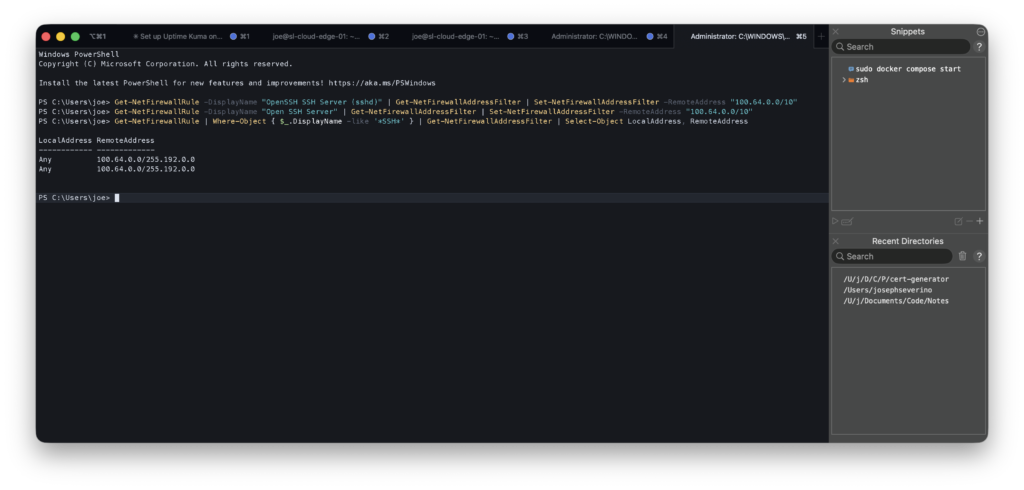
100.64.0.0/10, the Tailscale CGNAT range. Any connection from the LAN or public internet is dropped before it reaches the SSH service.Ubuntu Server VM
The VM has its own nftables host filter. SSH is restricted to the Tailscale CGNAT range and the home LAN subnet, a slightly wider scope than the Windows host because local LAN access to the VM is occasionally useful for debugging. The table is persisted via systemd and survives reboots.
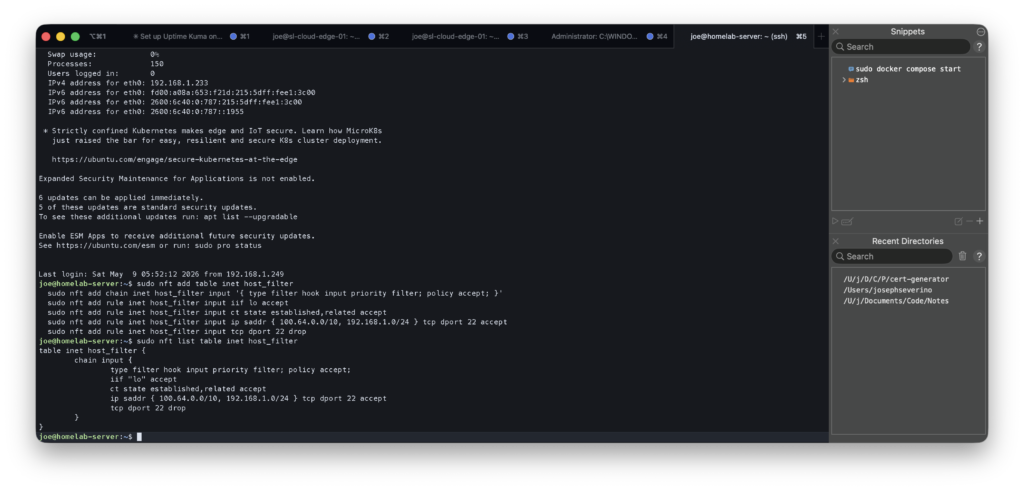
inet host_filter table applied on the Ubuntu VM. SSH is limited to Tailscale CGNAT plus the home LAN subnet. Both the Windows host and the VM enforce their own independent firewall rules.Subnet Routing
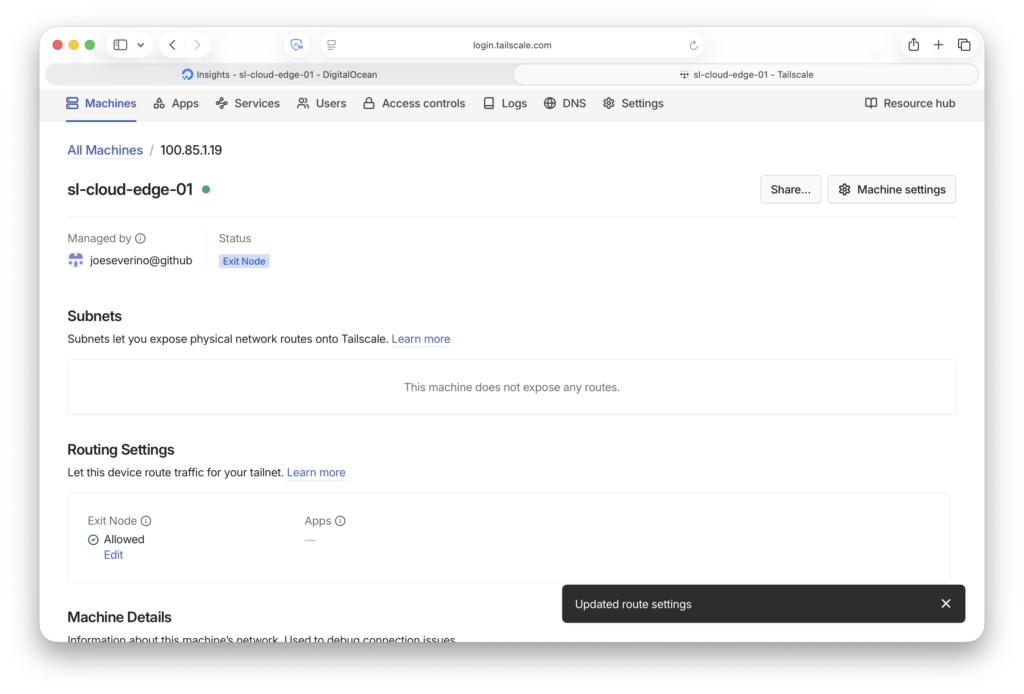
The OptiPlex advertises the full home LAN subnet (192.168.1.0/24) as a Tailscale subnet route. This gives tailnet devices access to anything on the home LAN that isn’t running Tailscale itself, like printers, TVs, or other LAN-only devices. Services running on Tailscale nodes are reached directly by their Tailscale IP, not through the subnet route.
Defense-in-Depth: Three Independent Layers
The architecture is designed so that no single compromised component exposes an application. An attacker needs to defeat three independent layers:
Layer 1: Network (Tailscale/WireGuard). A device that isn’t on the tailnet cannot establish a WireGuard tunnel to any node. Tailnet lock means even adding a device requires co-signing from a physically secured device.
Layer 2: Host Firewall. Every node runs its own firewall independently of Tailscale. nftables on the VPS and VM, Windows Firewall on the OptiPlex. These rules enforce access control at the host level. A Tailscale misconfiguration doesn’t automatically open the application. The layers don’t trust each other.
Layer 3: Application. Caddy enforces TLS and there’s no plain HTTP path. Uptime Kuma has no port exposed on the VPS host at all; it’s only reachable via Caddy on an internal Docker bridge network. External access to the application is forced through Caddy rather than a directly exposed container port.
Certificates: Two Authorities, Two Contexts
Two certificate authorities serve different parts of the stack.
For the VPS, I use a Let’s Encrypt wildcard certificate (*.jseverino.com) issued via Cloudflare’s DNS-01 ACME challenge. The challenge proves domain ownership through DNS records, not by serving a file over HTTP, which means the cert can be issued and renewed without the service ever being publicly reachable. The wildcard covers all subdomains and is trusted universally by browsers. It also serves as the origin certificate for Cloudflare Full (Strict) SSL mode on my public web server, which requires a legitimately-signed cert on the origin. A self-signed cert would fail the validation.
The entire issuance and renewal lifecycle is handled by tls-cert-renewal-automation, a tool I built and open-sourced. It runs Certbot with the Cloudflare DNS plugin, handles the DNS-01 challenge automatically, and deploys the renewed certificate over SSH. One cert, one automation. The same wildcard covers jseverino.com itself, the private VPS services, and anything else under the domain. Because the challenge is DNS-based rather than HTTP-based, it works equally for public sites and for services that are intentionally not reachable from the internet. No HTTP server needs to be exposed to complete the ACME validation.
For internal homelab services, I run a private root CA on an offline Debian VM in UTM on my Mac. The VM has no network access outside the Mac’s local hypervisor network. It’s not on the home LAN, not on Tailscale, not reachable from anywhere. It only boots when I need to issue a certificate. The CA key is passphrase-protected and never leaves the VM. A custom tool I wrote (cert-generator) handles the full issuance workflow: SSH into the VM, generate a CSR, prompt for the passphrase, sign the cert, retrieve the files, and clean up. The service private key doesn’t persist on the CA host after issuance.
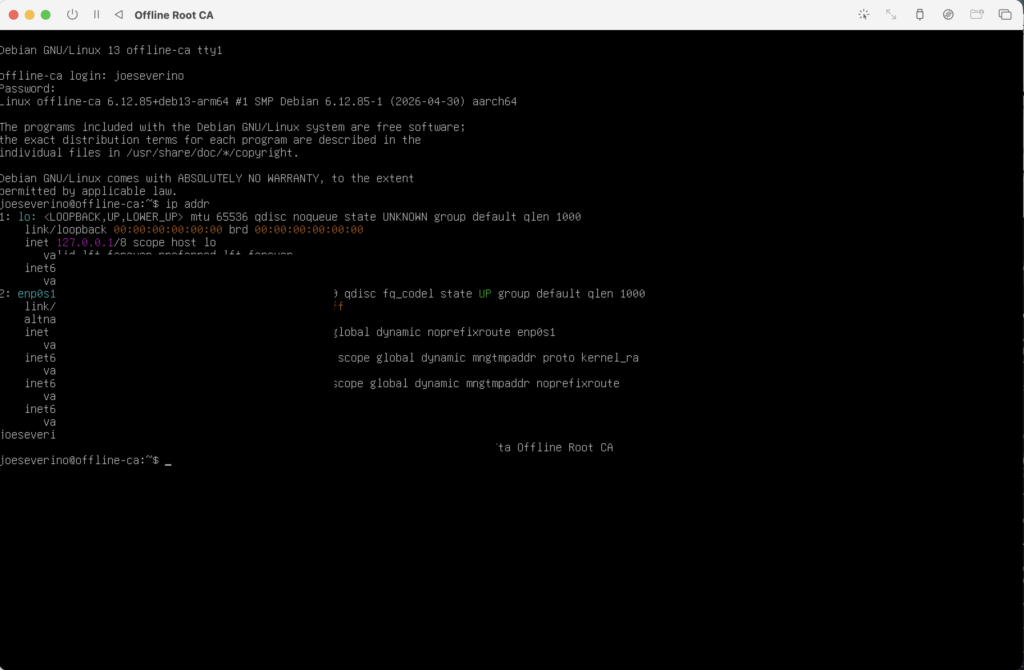
Compromising the homelab, VPS, or tailnet does not provide network access to the CA private key. A compromise of the Mac would still require access to the offline CA VM and the CA passphrase before a fraudulent certificate could be issued.
DNS as a Security Control
DNS plays an active role in access control here, not just naming.
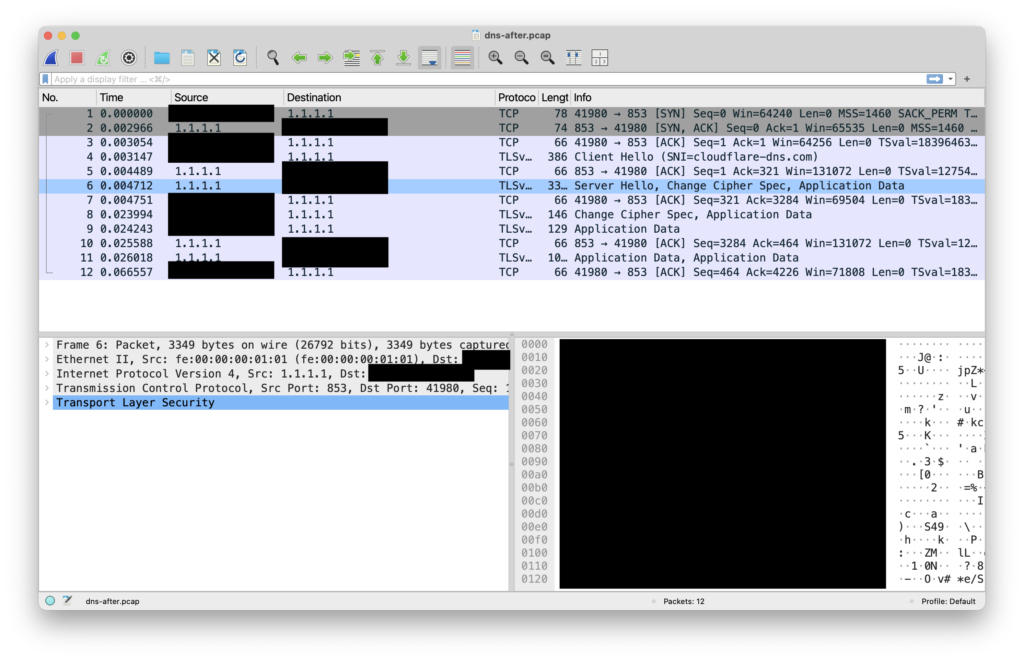
All Tailscale devices use AdGuard Home as their DNS resolver, enforced via Tailscale’s global nameserver setting with Override local DNS enabled. DNS queries from any tailnet device, regardless of physical location, travel over an encrypted WireGuard tunnel to AdGuard before going anywhere else. No plaintext DNS leaves any device. AdGuard forwards allowed queries upstream to Cloudflare over DNS-over-HTTPS, so that leg is encrypted too.
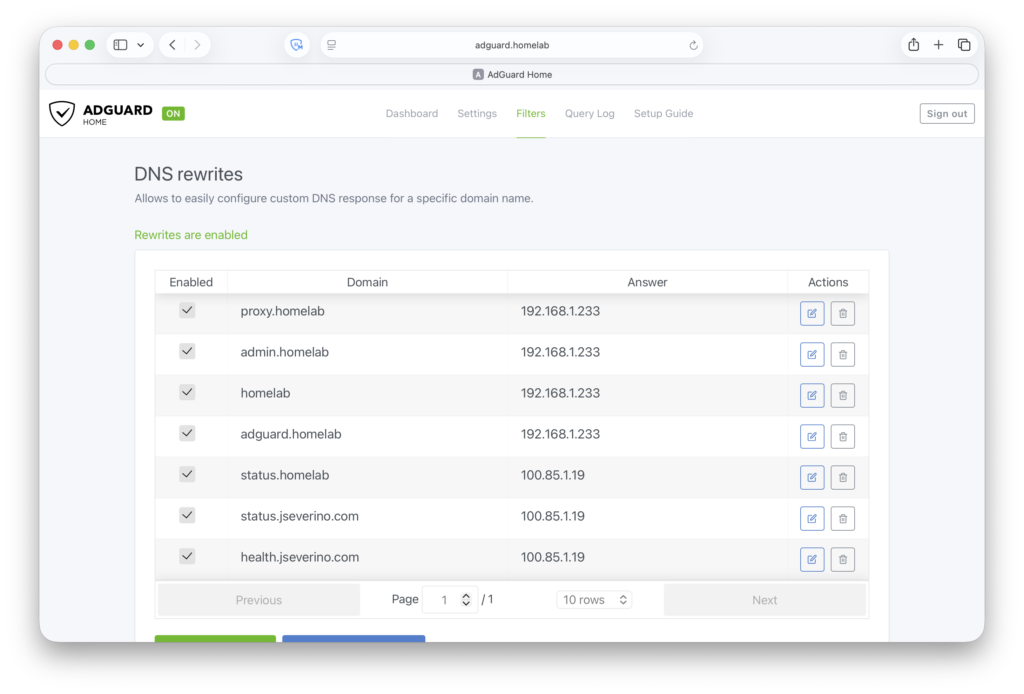
Internal service names, including subdomains like status.jseverino.com that have no public DNS record, resolve via AdGuard DNS rewrites to Tailscale IPs. Public resolvers return NXDOMAIN for these names. They don’t exist from the outside.
The VPS uses an independent Cloudflare DNS-over-TLS resolver via systemd-resolved. Routing its DNS through the homelab AdGuard would add latency and create an availability dependency. If the homelab VM is down, the VPS would lose DNS too. Keeping them separate means each side is self-sufficient.
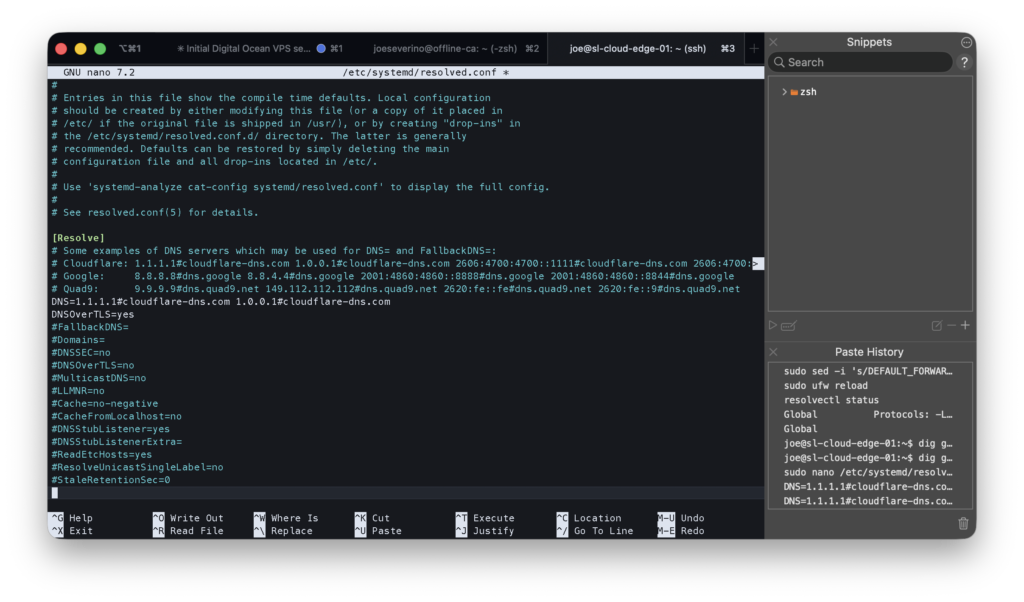
/etc/systemd/resolved.conf on the VPS. Cloudflare DoT is enforced globally and Domains=~. ensures this config wins over any per-link DNS pushed by DHCP or Tailscale.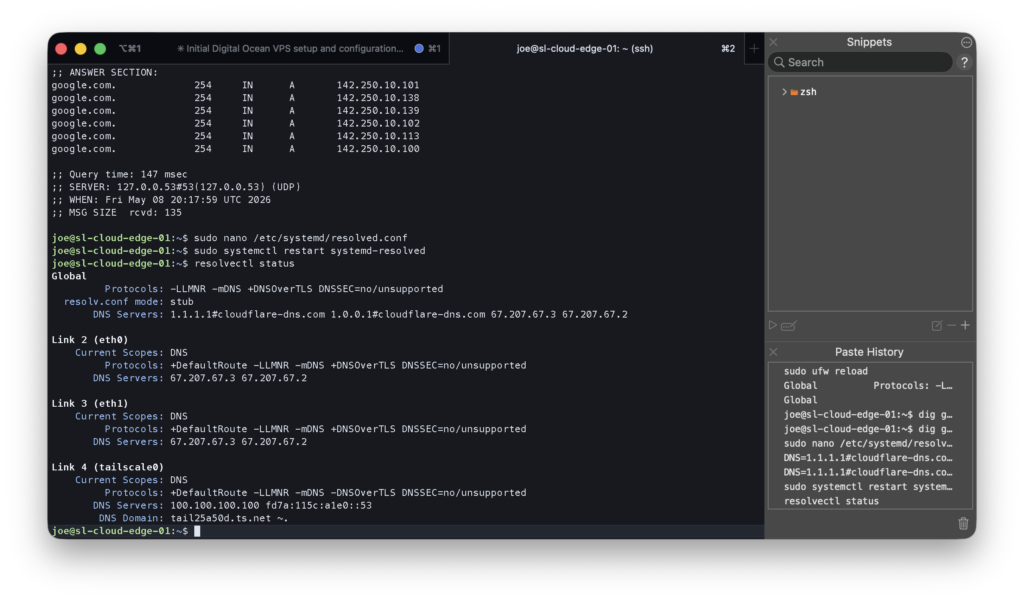
resolvectl status confirming DNS-over-TLS is active. All interfaces resolve via Cloudflare on port 853. No plaintext DNS leaves the VPS.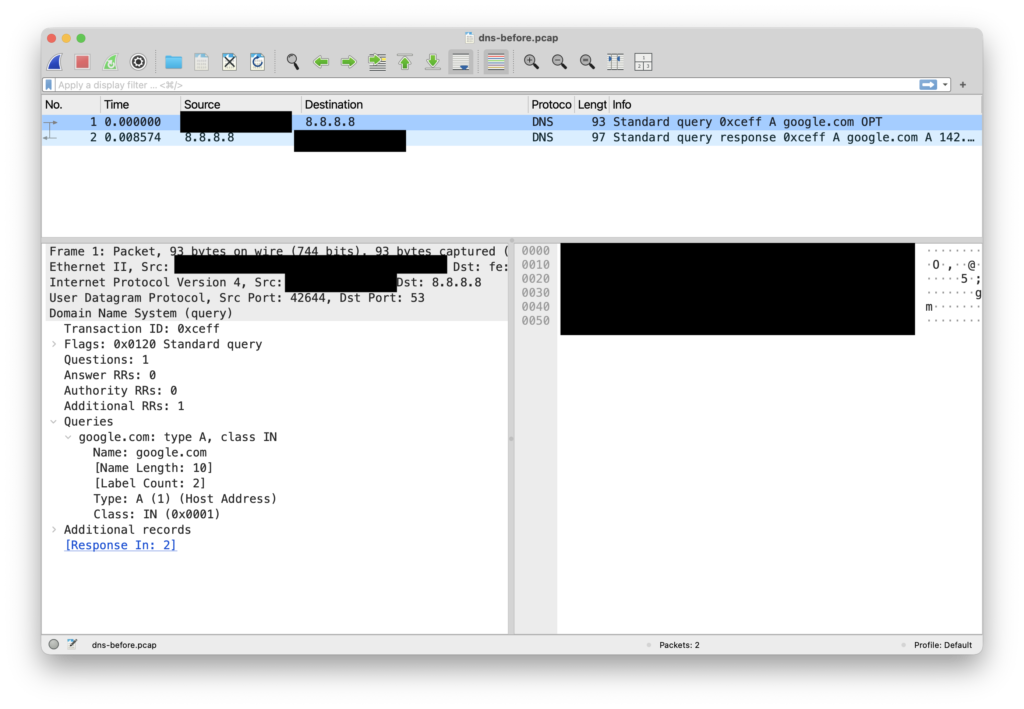
Monitoring: External Visibility
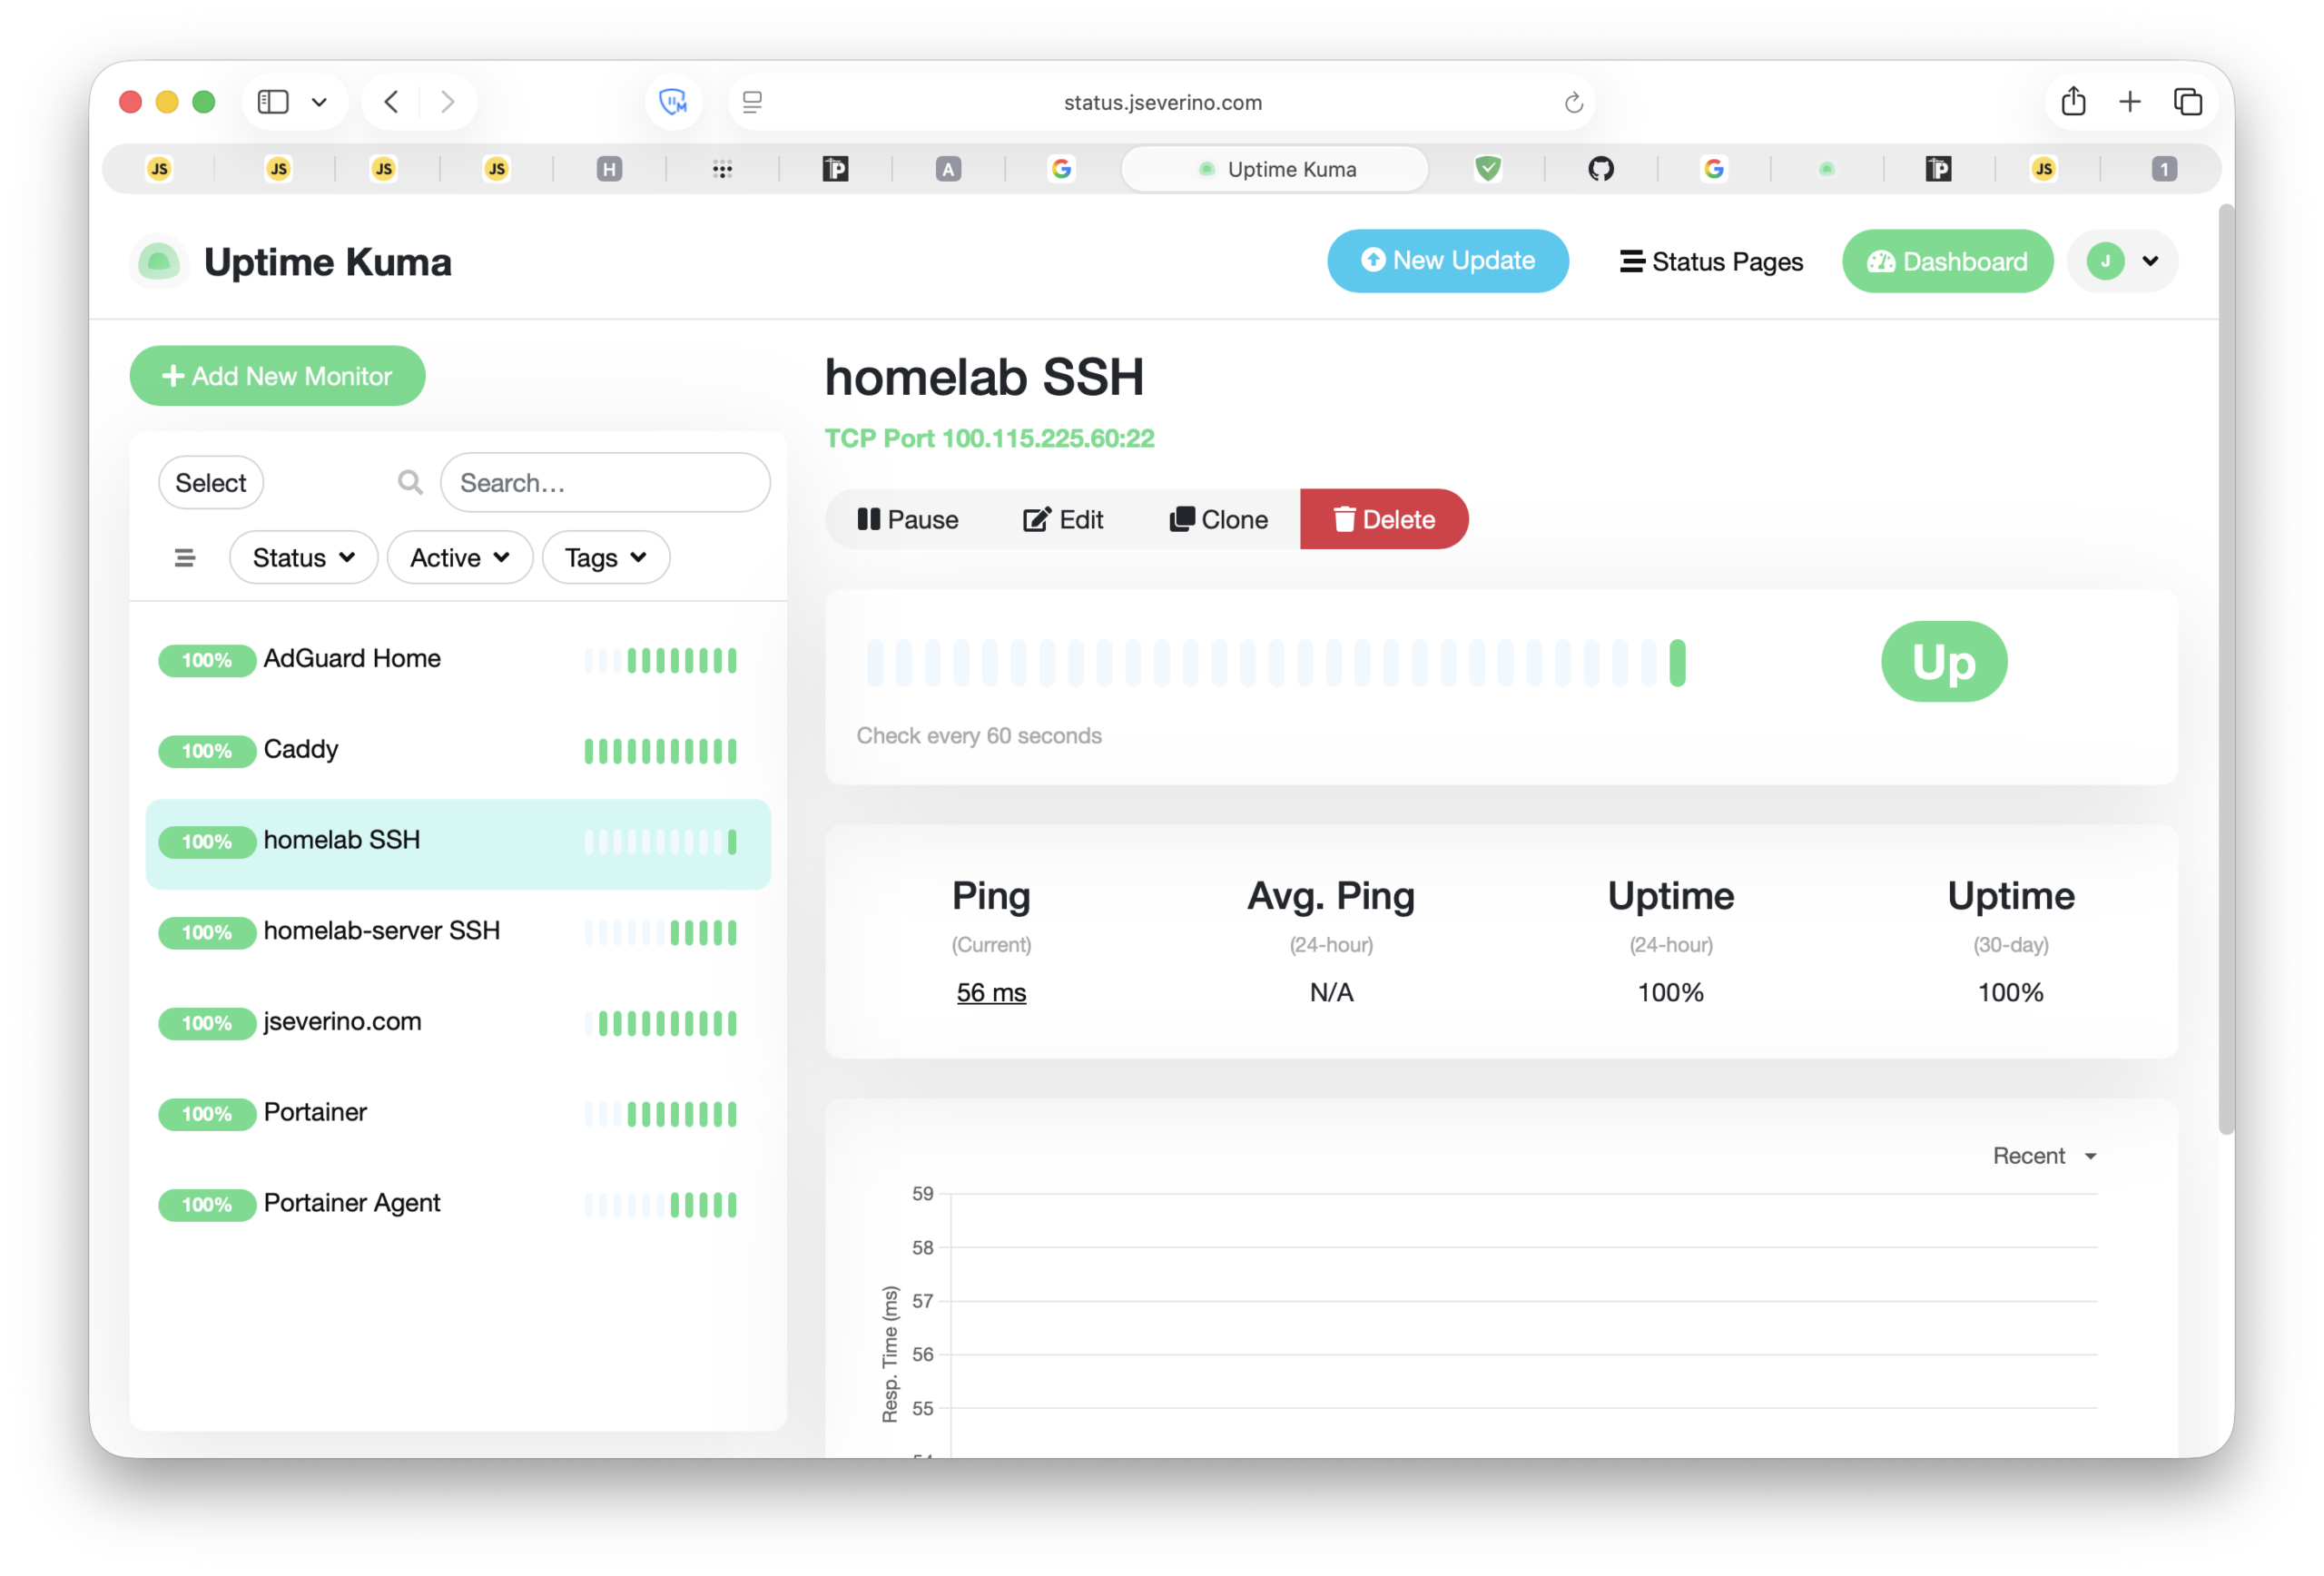
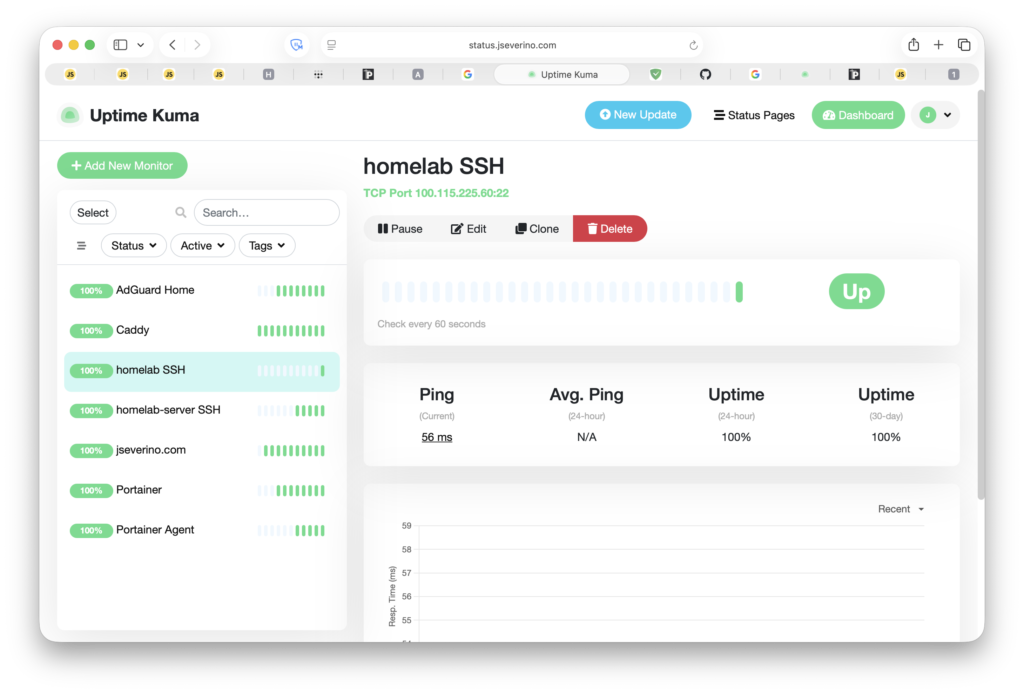
Uptime Kuma runs on the VPS and monitors all critical infrastructure from outside the homelab. If the homelab goes down (VM crash, OptiPlex reboot, network failure), Uptime Kuma is unaffected and catches the outage. An internal monitor would go dark alongside the thing it’s watching.
The monitoring dashboard itself is a private service accessible only to Tailscale nodes. It has a valid, browser-trusted Let’s Encrypt certificate but no public DNS record. Same pattern as everything else.
There’s a self-monitoring problem here: if Uptime Kuma monitored status.jseverino.com, it would be checking whether it could reach Caddy to proxy back to itself. If Caddy is down, the check fails. If Kuma is down, the check never runs. The loop makes the check meaningless. Instead, Caddy serves a dedicated health endpoint at health.jseverino.com that returns 200 OK directly with no backend. Caddy being alive is sufficient to confirm Kuma is reachable.
Remaining Risks
No architecture is without trade-offs. Two items are currently accepted or pending.
The wildcard TLS certificate’s private key lives on the VPS filesystem. It’s root-owned with restricted permissions, and SSH access to the VPS requires both a Tailscale session and a hardware-backed SSH key stored in iCloud Keychain under Advanced Data Protection. The risk is accepted for the current threat model.
Rootless Docker is planned for the VPS. The current setup runs Docker as root, which means a container escape would land in a root-equivalent context on the host. Rootless Docker limits the blast radius to an unprivileged user. The migration is on the roadmap but not yet complete.